Showing posts with label Sides. Show all posts

Monday, October 15, 2012

Roasted Acorn Squash!

When there is a crispness in the air and I need to pull out my jacket and boots, it's time to roast some squash! ...What? No? It's not a weird statement, okay? It's a choice. Anyway! Roasted acorn squash is delicious, plain and simple. Maple, cayenne, sage, and rosemary bring everything together in delicious harmony.
Shout "Recipe please" if you're hungry!

Tuesday, February 7, 2012

Who doesn't love french onions?


Or rather, the classic dish French Onion Soup. As anyone whose ever attempted to make the deeply flavorful soup can tell you, directions are usually filled with words like "time consuming", "slow caramelization", or "2 hours of simmering". Yes, caramelization of the onions is KEY here, but I speed it up a bit and am eating delicious soup in about 50 minutes rather than 2 hours. I use two different types of stock in this, beef for the deep rich base we all know and love in french onion soup, and chicken for that lighter and salty note. Please excuse the terrible cell phone photo. It was a late night craving. Oh, and you're welcome in advance for the soup.

What you need:
3 large spanish onions sliced
3 tablespoons salted butter
3 large crushed garlic cloves
Kosher salt and freshly ground pepper
2 very large thyme sprigs tied together with butchers twine
Dash of crushed red pepper
3 cups good quality (preferably homemade) beef stock
1 cup of the same quality chicken stock
About 1/4 cup cognac
Italian bread or some day-old baguette from dinner the night before, cubed
Gruyere or much less expensive swiss cheese, shredded (hey, we're on a budget here)

Here we go:
Heat the butter in a large heavy bottomed skillet and melt. Add in the sliced onions and turn the heat to medium low, here's where we need to pay the most attention because we don't want to burn the onions. Stir continuously until the onions start to soften and color, about 10 minutes. Add the garlic, salt, pepper, thyme, and red pepper.
Saute all together for about another 5-10 minutes or until the onions are nice and brown. Add the stocks. Ready? Leave it alone! Let it simmer together for about 20-30 minutes, depending on how impatient you are. Stir in the cognac 5 minutes before
the end of the cooking time.
Serve up the soup in oven safe bowls, top with the bread and cheese and throw under the broiler until they become brown and bubbly. Time varies on the broiler, mine takes about 3 minutes.
Enjoy!

I can't really think of another soup I want more on a cold winter day. Well to be honest, any day. Leftovers just gain in flavor, so I make double batches to whip out for a quick lunch or dinner.
Onion soup in about 50 minutes? Sign me up.


Wednesday, February 2, 2011

Pickled Red Onion.

This is the perfect acidic topping for your favorite tacos. You know your favorite tacos, right? The recipe that I just posted!
Wishful thinking, or confidence? You decide!

Pickled Red Onion

You will need:
1 1/2 cups thinly sliced red onion
1/2 cup red wine vinegar
1/4 cup lime juice
1/4 cup water
4 tablespoons honey
1 tablespoon kosher salt

Combine the vinegar, lime juice, water, honey and salt in a small saucepan and bring to a boil.
Turn off the heat and let come to room temperature.
Pour this over the onion and let sit in the fridge for at least 5 hours before using.


Top these delicious chicken tacos with queso fresco or your preferred salty white cheese,
pickled red onion, the pumpkin arbol salsa (recipe to follow).
These individual recipes would taste great on any other taco filling you like as well, be it carne asada, roasted pork, or add a flavorful boost to vegetarian options.
Share them! There's no way you can eat them all.
I know what you're thinking...
"is that a challenge?"

Pumpkin Arbol Salsa

This recipe is courtesy of Calexico restaurant and Hungry Nation (I believe...)


I used fresh jalapenos in my version, which is why it's a vibrant green color. Use what you can!

Sunday, January 2, 2011

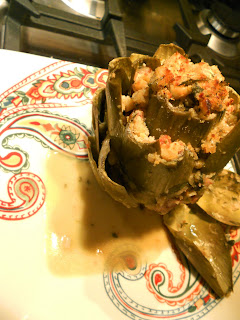
Stuffed Artichokes.

Most people I've encountered through life, about 80%, see cooking as a chore to be disregarded for the easy task of take-out cuisine. On days like today I wonder to myself what they do on special occasions where food is (noticeably, or not) the epicenter of the day. Do they have it catered by a favorite place? Order pizza? Or simply go out? Whatever it is that works best for them is nice, but in my family we cook all day for nothing more than the enjoyment of spending
time together in the kitchen, and watching as we all remember why it is we love our family food.
My older sister turned 25 today (Happy Birthday! Again.) and wanted my pop-pop's(grandfather's) chicken soup, and stuffed artichokes.
This recipe I made with inspiration from when my family and I had the most wonderful stuffed artichokes at a tiny restaurant called Piccolo's (Ha...) Salty, tangy, savory, and lovely in everyway- I hope you make these for someone you love too.


You will need:
6 Artichokes
2 Lemons
2 cups White wine
1 1/2 cups Bread-crumbs
1 1/2 cups Grated Parmesan cheese
6 Minced cloves of garlic
1 Bunch minced Parsley
1/2 cup Toasted pine nuts
6 (relatively thin) Pieces of cooked pancetta(omit if vegetarian)
1 4-ounce package of goat cheese
1/2 tsp. Crushed red pepper
1 Large bowl of water
Olive oil
3 tbs Butter
Salt and Pepper to taste

To start: Cut 1 of the lemons in half and squeeze the juice into the bowl of water, adding the lemon halves. Set aside.
Trim off the top and stem of the artichoke and cut the tops of the individual leaves to remove the prickly bit atop. Take a melon baller and scoop out the choke of the artichoke, or the tiny hairs that are directly in the middle of the vegetable. (You will remove inner leaves during this process and some purple thin leaves just before you get to the choke itself, but that's normal.) Rinse out the trimmed artichokes and place into the bowl of lemon water.

In a separate bowl, combine the bread crumbs, parmesan, garlic, parsley, toasted pine nuts, cooked pancetta, crumbled goat cheese, and red pepper flakes. Because of the parmesan and pancetta, you will probably not need to add salt to this, but you can adjust to your taste.
Drizzle in olive oil until this creates a paste that holds together well but is not overly mushy.

In a large pot with a lid, add the 2 cups of white wine and then the trimmed artichokes cut side up. Add enough of the lemon water they were sitting in to reach about 3/4 of the way up the artichokes. Salt the artichokes and bring to a boil with the lid on.
Cook these for about 30 minutes in a boil with the lid.

Remove them from the pot and stuff the inner part as well as the outer leaves with the reserved stuffing. Place them back into their cooking liquid to finish them off for about another 20 minutes with the lid on yet again.

When they're tender, turn off your stove and remove them to a broiler-safe baking dish. DO NOT DISCARD THE COOKING LIQUID. Sprinkle them with a small amount of parmesan cheese and place under the broiler to get crispy and just browned.
While they're browning, turn your attention to the cooking liquid which should be reduced drastically and extraordinarily tasty. Bring this to a simmer over medium heat and whisk in 3 tbs butter to finish the sauce.
Serve the artichokes hot with plenty of their sauce spooned over.


I hope you love these as much as my family does- and please share them with people who mean the most.
Happy Birthday sis! I love you!

Wednesday, September 8, 2010

Hello stove, I've returned to you.

Well, perhaps I don't mean my stove, rather the blog that connects my stove and myself to all of you.
Over a month since my last post and throughout that time I have considered, re-considered, troubled, and helped myself with only two constant factors, cooking and enjoying photography through it.
I'm here now, yes with new recipes, new ideas, new attempts, and continued writing. All for you.
LET'S DO THIS.

Returning recipe number 1.
Spicy Zucchini Fritters


Well first thing's first. Let's talk about what a fritter is exactly.
Essentially, it's a small cake that's made by frying a batter of some sort. Whatever you add into the batter determines what kind of fritter you're making.
They should ideally be crispy on the outside, golden brown and flavorful, with a soft inside.
These certainly deliver on all levels, the add-in of cayenne pepper makes it my favorite fritter yet.
Things you should definitely have on hand:
A frying thermometer
An assembly line consisting of the bowl of batter, cooling racks with paper towels underneath for draining, and a slotted spoon on hand.

You will need:
5 medium sized zucchini, grated with the large holes on a box grater
Around 7 tbs all-purpose flour (more if too wet, less if too dry)
1/2 tsp baking powder
1/4 cup beer
4-ounces goat cheese
1/4 tsp cayenne pepper
2 tbs sauteed onions
1/2 a bunch of fresh basil, torn
6 tbs chives, chopped
A good amount of kosher salt and freshly ground pepper

Sprinkle 1 teaspoon or so of salt on top of the grated zucchini and let it stand in a colander over a bowl for about 20 minutes. Press on the zucchini to get rid of all the extra moisture. Empty the drained zucchini (that should now be relatively dry) into a small bowl and set aside.
In a medium bowl, combine the flour, baking powder, cayenne, salt and pepper. Mix in the beer and sauteed onions. Place the zucchini into the batter, along with the basil and chives. Mix in the goat cheese.
Heat a heavy pan with enough vegetable oil to do a shallow fry (about 1 cup) to 350 degrees.
Drop 1/4 cup amounts of the batter into the hot oil, lightly pressing on the fritter to flatten it slightly. Cook until the edges start to brown, and flip continuing to cook for a total of 8 minutes. (4 mins per side)
Work in batches until all of the fritters are made, transferring them to the draining rack.
Allow to slightly cool and devour immediately.
Just for everyones information: this made me hungry writing. This will be part of my dinner tonight.
Let's eat them together?




Thursday, June 24, 2010

Farmers Market Part 1.

Radish Relish- say that 10 times fast!
Well anyway- upon some research I did in the category of French Breakfast Radishes, I found out that they're one of the earliest crops of radishes. They have a mild flavor, similar to that of the Daikon Radish, and they're texture is similar also. They are not nearly as peppery as radishes we've all come to know and love, but the pepper is absolutely there in the back of your throat.
So I decided to make a Radish Relish!
The heat from the raw radishes, and the freshness of lemon and fresh herbs makes a perfect topping for fish, chicken, or any other dish that needs a little brightening up, and texture!

Radish Relish


You will need:
About 6 French Breakfast Radishes
1/2 cup chopped parsley
1/4 cup chopped basil
1 lemon zested and half juiced
1/2 cup herbed olive oil (of your choosing. Mine is thyme, bay leaf, garlic, sage)
1 garlic clove, minced
A good amount of salt and pepper, to taste.

Chop the radishes into a dice, and combine the rest of the ingredients in a bowl.
Mix to combine and let sit in the fridge for at least 1 hour before eating. Remember- the longer it sits, the better it tastes!
*If you want to make your own herbed olive oil- combine olive oil and herbs and whole garlic cloves in a saucepan. Warm the oil for about 4 minutes, DO NOT FRY! Wait until it gets somewhat fragrant, and then set off heat. Let this cool and you have yourself a flavorful oil, able to be used on anything you may be cooking.

Up next:
Main Course.
Following:
Side Dishes.


Saturday, June 12, 2010

Garlic Breath.

This recipe is one I remember from the hundreds of family parties that my mother has spent slaving away cooking for.
She made this bruschetta that to me, seemed so amazing and delicious, I thought I could never replicate it.
I ruined many dinners scarfing down this bruschetta on toasted bread, and now I think it's time you did too.
Beware: those who don't love garlic as much as my italian family, make it with half the amount.


Ma's Bruschetta
You'll need:
About 7 good sized tomatoes, diced
8 garlic cloves, minced
1 large bunch of fresh basil, torn
1/2 cup olive oil
Fresh ground pepper and kosher salt to taste

Combine all ingredients, let sit for at least 1 hour before smothering into your face.
If they're around, heirloom tomatoes are beautiful and tasty in this- use them!
I've warned you! It's stupidly simple, but capable of ruining your date night. At lease they'll know you're a good cook!


A little tip from me to you:
Keep mints on hand for worry-free eating.

Thanks mom!
-Megan.